Web Component Token Examples
Overview of Web Component tokens
Due to the inherent risk of front end authorization, we have a fine-grained access token pattern for our web components. The following table describes which roles can be used to render a web component. We assume you have an authorize admin API key to complete the example API calls, and use that key to generate the Web Component Token.
Roles need for each component
| Component | Pre-Requisite | Role |
|---|---|---|
| BusinessDetails | Existing Business Id | read:business:business_id or write:business:business_id |
| BusinessForm | Existing Business Id | write:business:business_id |
| BusinessFormStepped | Existing Business Id | write:business:business_id |
| GrossPaymentChart | Existing Sub Account | read:account:account_id or write:account:id |
| PaymentDetails | Existing Sub Account | read:account:account_id or write:account:id |
| PaymentList | Existing Sub Account | read:account:account_id or write:account:id |
| PayoutDetails | Existing Sub Account | read:account:account_id or write:account:id |
| PayoutList | Existing Sub Account | read:account:account_id or write:account:id |
| Checkout | Checkout created | write:checkout:checkout_id |
| CardForm | Existing Sub Account | write:tokenize:account_id |
| BankAccountForm | Existing Sub Account | write:tokenize:account_id |
General Usage
The pattern for using a web component starts in a backend request. Your backend should have a client token generated. Then, you need to find or create the resource the component needs to function, for example create a business before rendering the BusinessForm component. Next, you generate a web component token, which is good for 60 minutes, using the id(s) of the resources you will render. You then use this as the auth-token attribute to render the component in your front end.
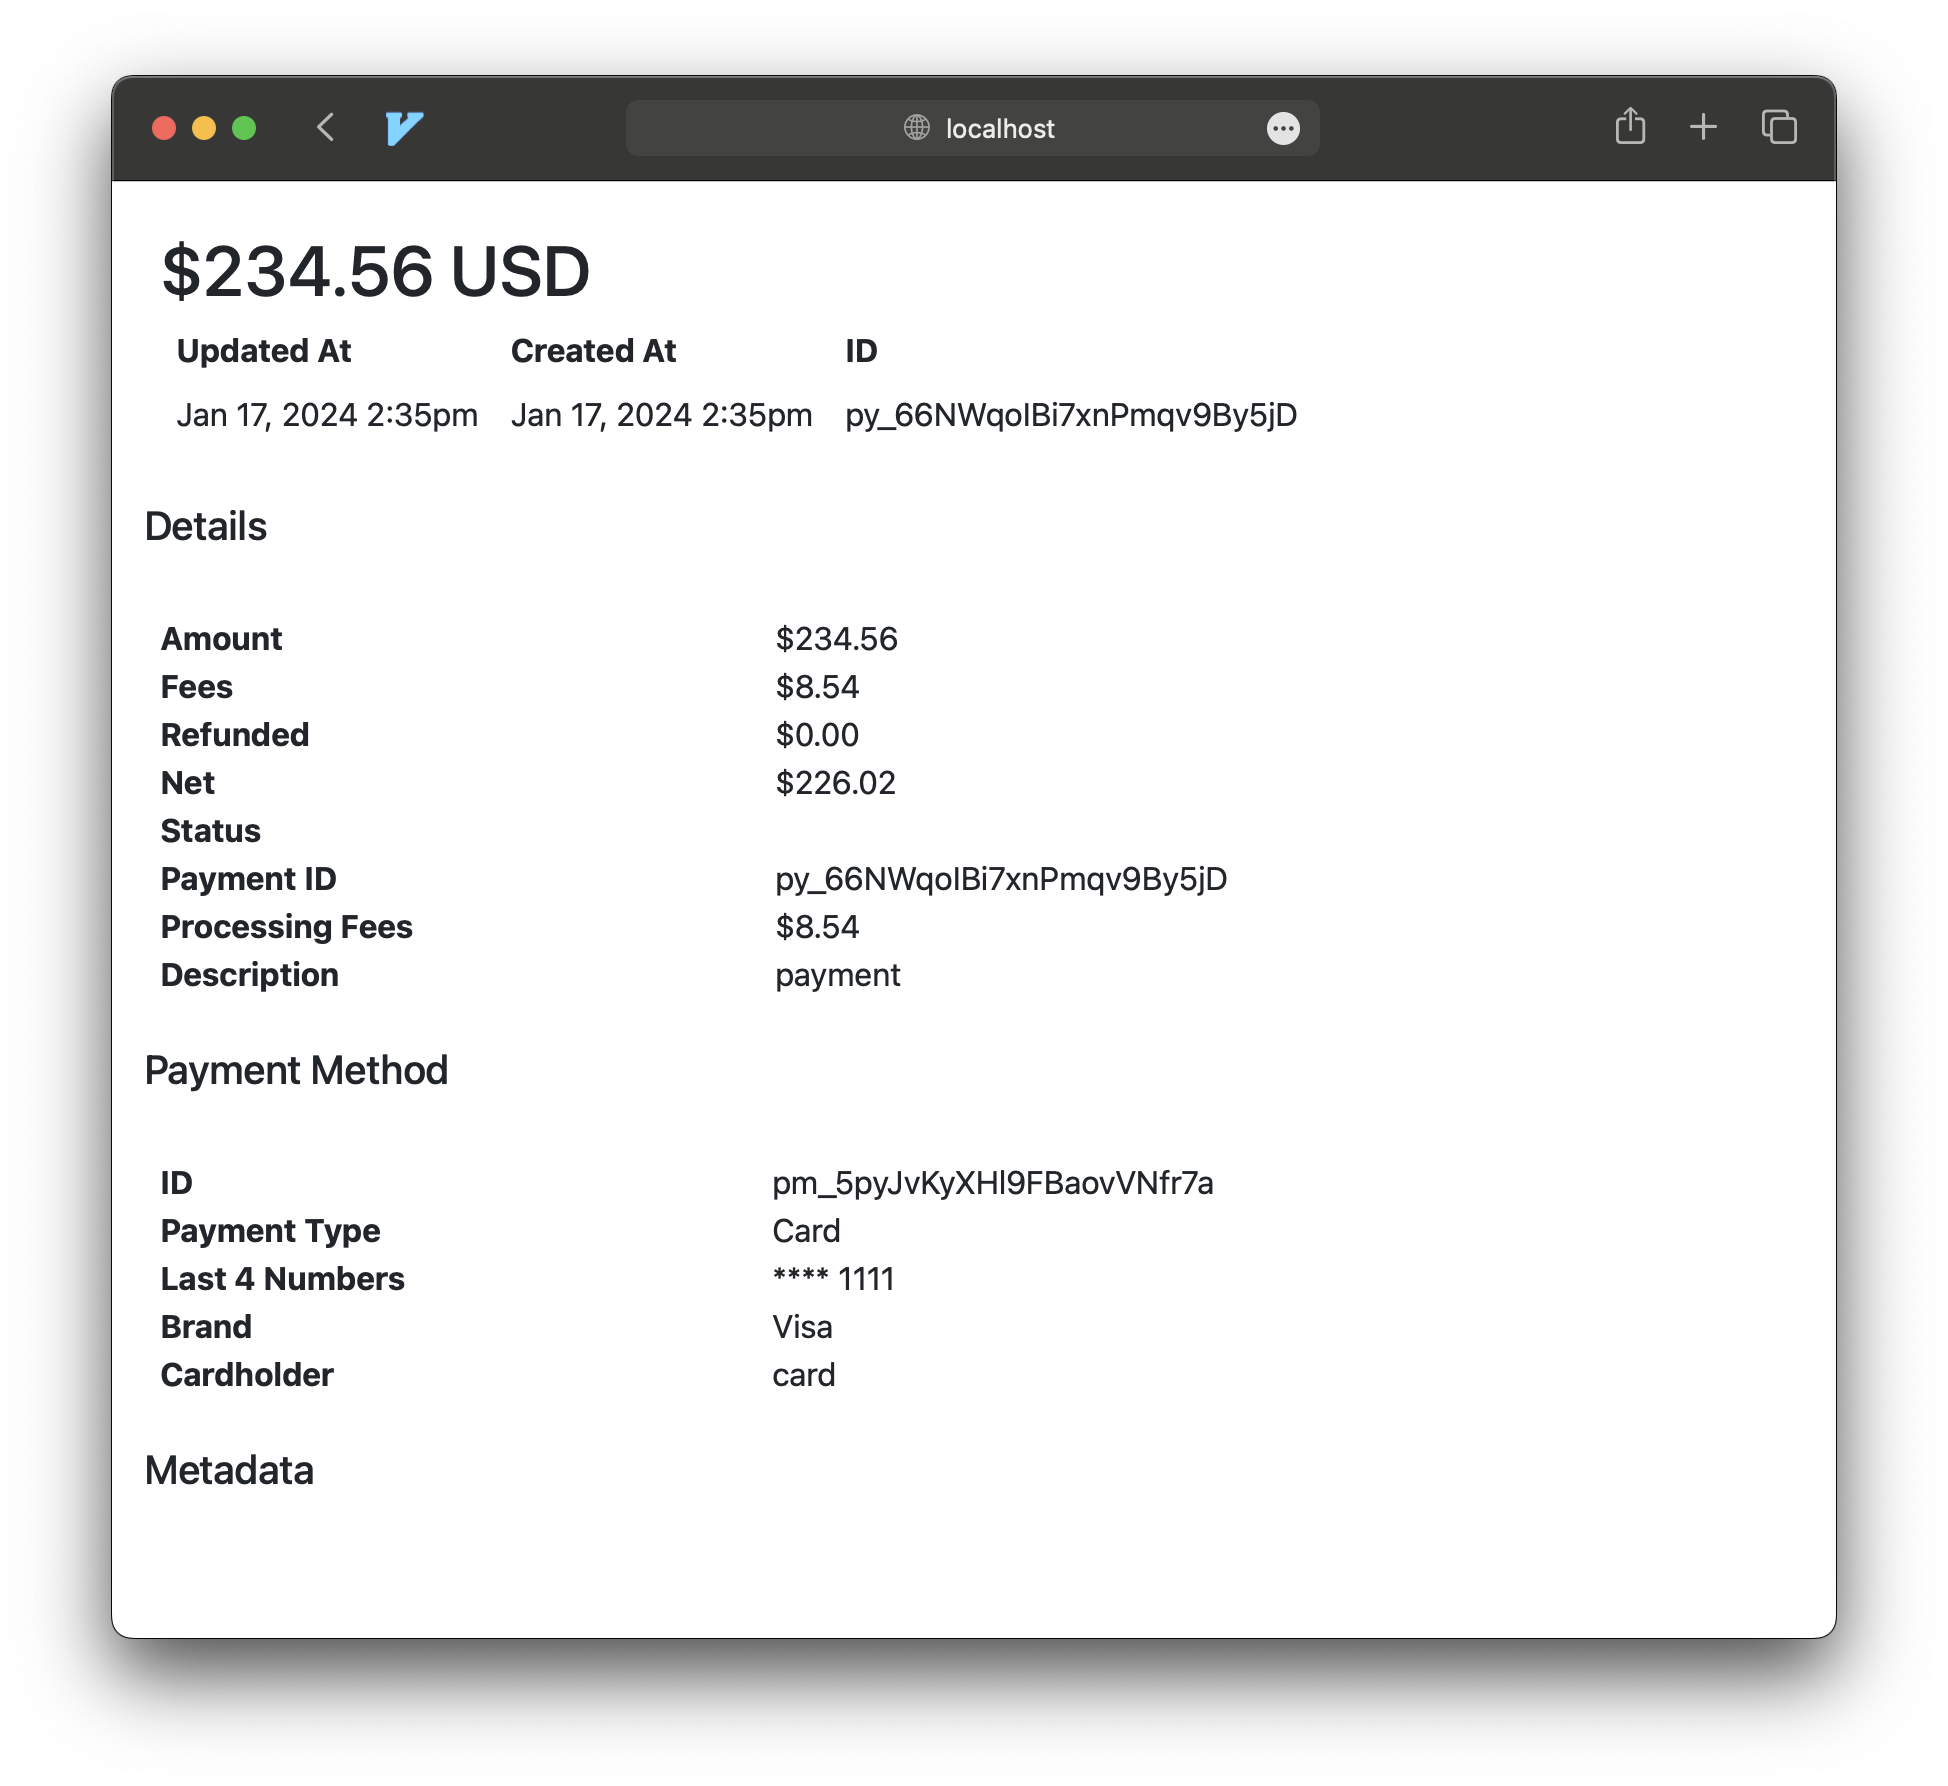
Here is an example of retrieving a payment and rendering the payment details.
The following steps show how to get the latest payment, generate a web component token, and render the PaymentDetails web component (copy and paste each block of code in a terminal to test using your credentials):
We use curl to make the API calls in the terminal, and jq to parse the json response. You can install using homebrew on a mac or chocolatey on windows.
- Generate Access Token API
ACCESS_TOKEN_RESPONSE=$(curl -sS --request POST \
  --url https://api.justifi.ai/oauth/token \
  --header 'Content-Type: application/json' \
  --data '{
    "client_id":"test_abc1234",
    "client_secret":"test_xyz9876"
  }'
)
- Get the access_token and print to the console
ACCESS_TOKEN=$(echo $ACCESS_TOKEN_RESPONSE | jq -r '.access_token')
echo "Access Token: ${ACCESS_TOKEN}"
- List Payments API using the access_token generated above and a test account:
ACCOUNT_ID="acc_abc1234"

PAYMENT_LIST=$(curl -sS --request GET \
  --url https://api.justifi.ai/v1/payments \
  --header 'Authorization: Bearer '${ACCESS_TOKEN}'' \
  --header 'Sub-Account: '${ACCOUNT_ID}''
)
- Get the first payment_id from payment list (= latest payment) and print to the console
PAYMENT_ID=$(echo ${PAYMENT_LIST} | jq -r '.data[0].id')
echo "Payment ID: ${PAYMENT_ID}"
- Generate Web Component Token API (note: replace acc_abc1234 with the account id from step 3)
WC_TOKEN_RESPONSE=$(curl -sS --request POST \
  --url https://api.justifi.ai/v1/web_component_tokens \
  --header 'Authorization: Bearer '${ACCESS_TOKEN}'' \
  --header 'Content-Type: application/json' \
  --data '{ "resources": [ "read:account:acc_abc1234" ] }'
)
- Get the webcomponent_token and print to the console (_note: this token is good for 60 minutes)
WEB_COMPONENT_TOKEN=$(echo $WC_TOKEN_RESPONSE | jq -r '.access_token')
echo "Web Component Token: ${WEB_COMPONENT_TOKEN}"
Front end code: payment_details.html
note: replace WEB_COMPONENT_TOKEN and PAYMENT_ID with the values from the terminal script above
<!doctype html>
<html dir="ltr" lang="en">
  <head>
    <meta charset="utf-8" />
    <meta
      name="viewport"
      content="width=device-width, initial-scale=1.0, minimum-scale=1.0, maximum-scale=5.0"
    />
    <title>justifi-payment-details</title>
    <script
      type="module"
      src="https://cdn.jsdelivr.net/npm/@justifi/webcomponents@4.7.4/dist/webcomponents/webcomponents.esm.js"
    ></script>
    <script
      nomodule
      src="https://cdn.jsdelivr.net/npm/@justifi/webcomponents@4.7.4/dist/webcomponents/webcomponents.js"
    ></script>
  </head>
  <body>
    <justifi-payment-details
      auth-token="${WEB_COMPONENT_TOKEN}"
      payment-id="${PAYMENT_ID}"
    >
    </justifi-payment-details>
  </body>
</html>
Open the file in your browser OR run a local web server (you may use any web server)
note: if you have python3 installed, you can run the following command on the folder the html file was created to start a local web server.
# example using Python
python3 -m http.server
Open the file OR go to http://localhost:8000/payment_details.html, you should see the payment details web component:
Front end code: payment_list.html
note: replace WEB_COMPONENT_TOKEN and ACCOUNT_ID with the values from the terminal script above
<!doctype html>
<html dir="ltr" lang="en">
  <head>
    <meta charset="utf-8" />
    <meta
      name="viewport"
      content="width=device-width, initial-scale=1.0, minimum-scale=1.0, maximum-scale=5.0"
    />
    <title>justifi-payments-list</title>
    <script
      type="module"
      src="https://cdn.jsdelivr.net/npm/@justifi/webcomponents@4.7.4/dist/webcomponents/webcomponents.esm.js"
    ></script>
    <script
      nomodule
      src="https://cdn.jsdelivr.net/npm/@justifi/webcomponents@4.7.4/dist/webcomponents/webcomponents.js"
    ></script>
  </head>
  <body>
    <justifi-payments-list
      auth-token="${WEB_COMPONENT_TOKEN}"
      account-id="${ACCOUNT_ID}"
    >
    </justifi-payments-list>
    <script>
      window.addEventListener('payment-row-clicked', (event) => {
        // event.detail contains all the necessary information to call an endpoint to get more details on this entity
        const entityID = event.detail.id;
        alert(`You clicked on ${entityID}`);
      });
    </script>
  </body>
</html>
Open the file or go to http://localhost:8000/payment_list.html, you should see the payment list web component:

Create a business and render the Payment Provisioning component
The following steps shows how to create a business entity, generate a web component token, and render the PaymentProvisioning web component:
- Generate Access Token API
ACCESS_TOKEN_RESPONSE=$(curl -sS --request POST \
  --url https://api.justifi.ai/oauth/token \
  --header 'Content-Type: application/json' \
  --data '{
    "client_id":"test_abc1234",
    "client_secret":"test_xyz9876"
  }'
)
- Get the access_token from the response and print to the console
ACCESS_TOKEN=$(echo $ACCESS_TOKEN_RESPONSE | jq -r '.access_token')
echo "Access Token: ${ACCESS_TOKEN}"
- Create a business entity API using the access_token generated above:
BUSINESS_RESPONSE=$(curl -sS --request POST \
  --url https://api.justifi.ai/v1/entities/business \
  --header 'Authorization: Bearer '${ACCESS_TOKEN}'' \
  --header 'Content-Type: application/json' \
  --data '{
	  "legal_name": "USS Enterprise"
  }'
)
- Get the business_id from the resopnse and print to the console
BUSINESS_ID=$(echo ${BUSINESS_RESPONSE} | jq -r '.id')
echo "Business ID: ${BUSINESS_ID}"
- Generate Web Component Token API (note: replace biz_abc1234 with the business id from step 4 above)
WC_TOKEN_RESPONSE=$(curl -sS --request POST \
  --url https://api.justifi.ai/v1/web_component_tokens \
  --header 'Authorization: Bearer '${ACCESS_TOKEN}'' \
  --header 'Content-Type: application/json' \
  --data '{ "resources": [ "write:business:biz_abc1234" ] }'
)
- Get the web_component_token from the response and print to the console
WEB_COMPONENT_TOKEN=$(echo $WC_TOKEN_RESPONSE | jq -r '.access_token')
echo "Web Component Token: ${WEB_COMPONENT_TOKEN}"
Front end code: payment_provisioning.html
note: replace WEB_COMPONENT_TOKEN and BUSINESS_ID with the values from the terminal script above
<!doctype html>
<html dir="ltr" lang="en">
  <head>
    <meta charset="utf-8" />
    <meta
      name="viewport"
      content="width=device-width, initial-scale=1.0, minimum-scale=1.0, maximum-scale=5.0"
    />
    <title>justifi-payment-details</title>
    <script
      type="module"
      src="https://cdn.jsdelivr.net/npm/@justifi/webcomponents@4.11.0/dist/webcomponents/webcomponents.esm.js"
    ></script>
    <script
      nomodule
      src="https://cdn.jsdelivr.net/npm/@justifi/webcomponents@4.11.0/dist/webcomponents/webcomponents.js"
    ></script>
  </head>
  <body>
    <justifi-payment-provisioning
      business-id="${BUSINESS_ID}"
      auth-token="${WEB_COMPONENT_TOKEN}"
    >
    </justifi-payment-provisioning>
  </body>
</html>
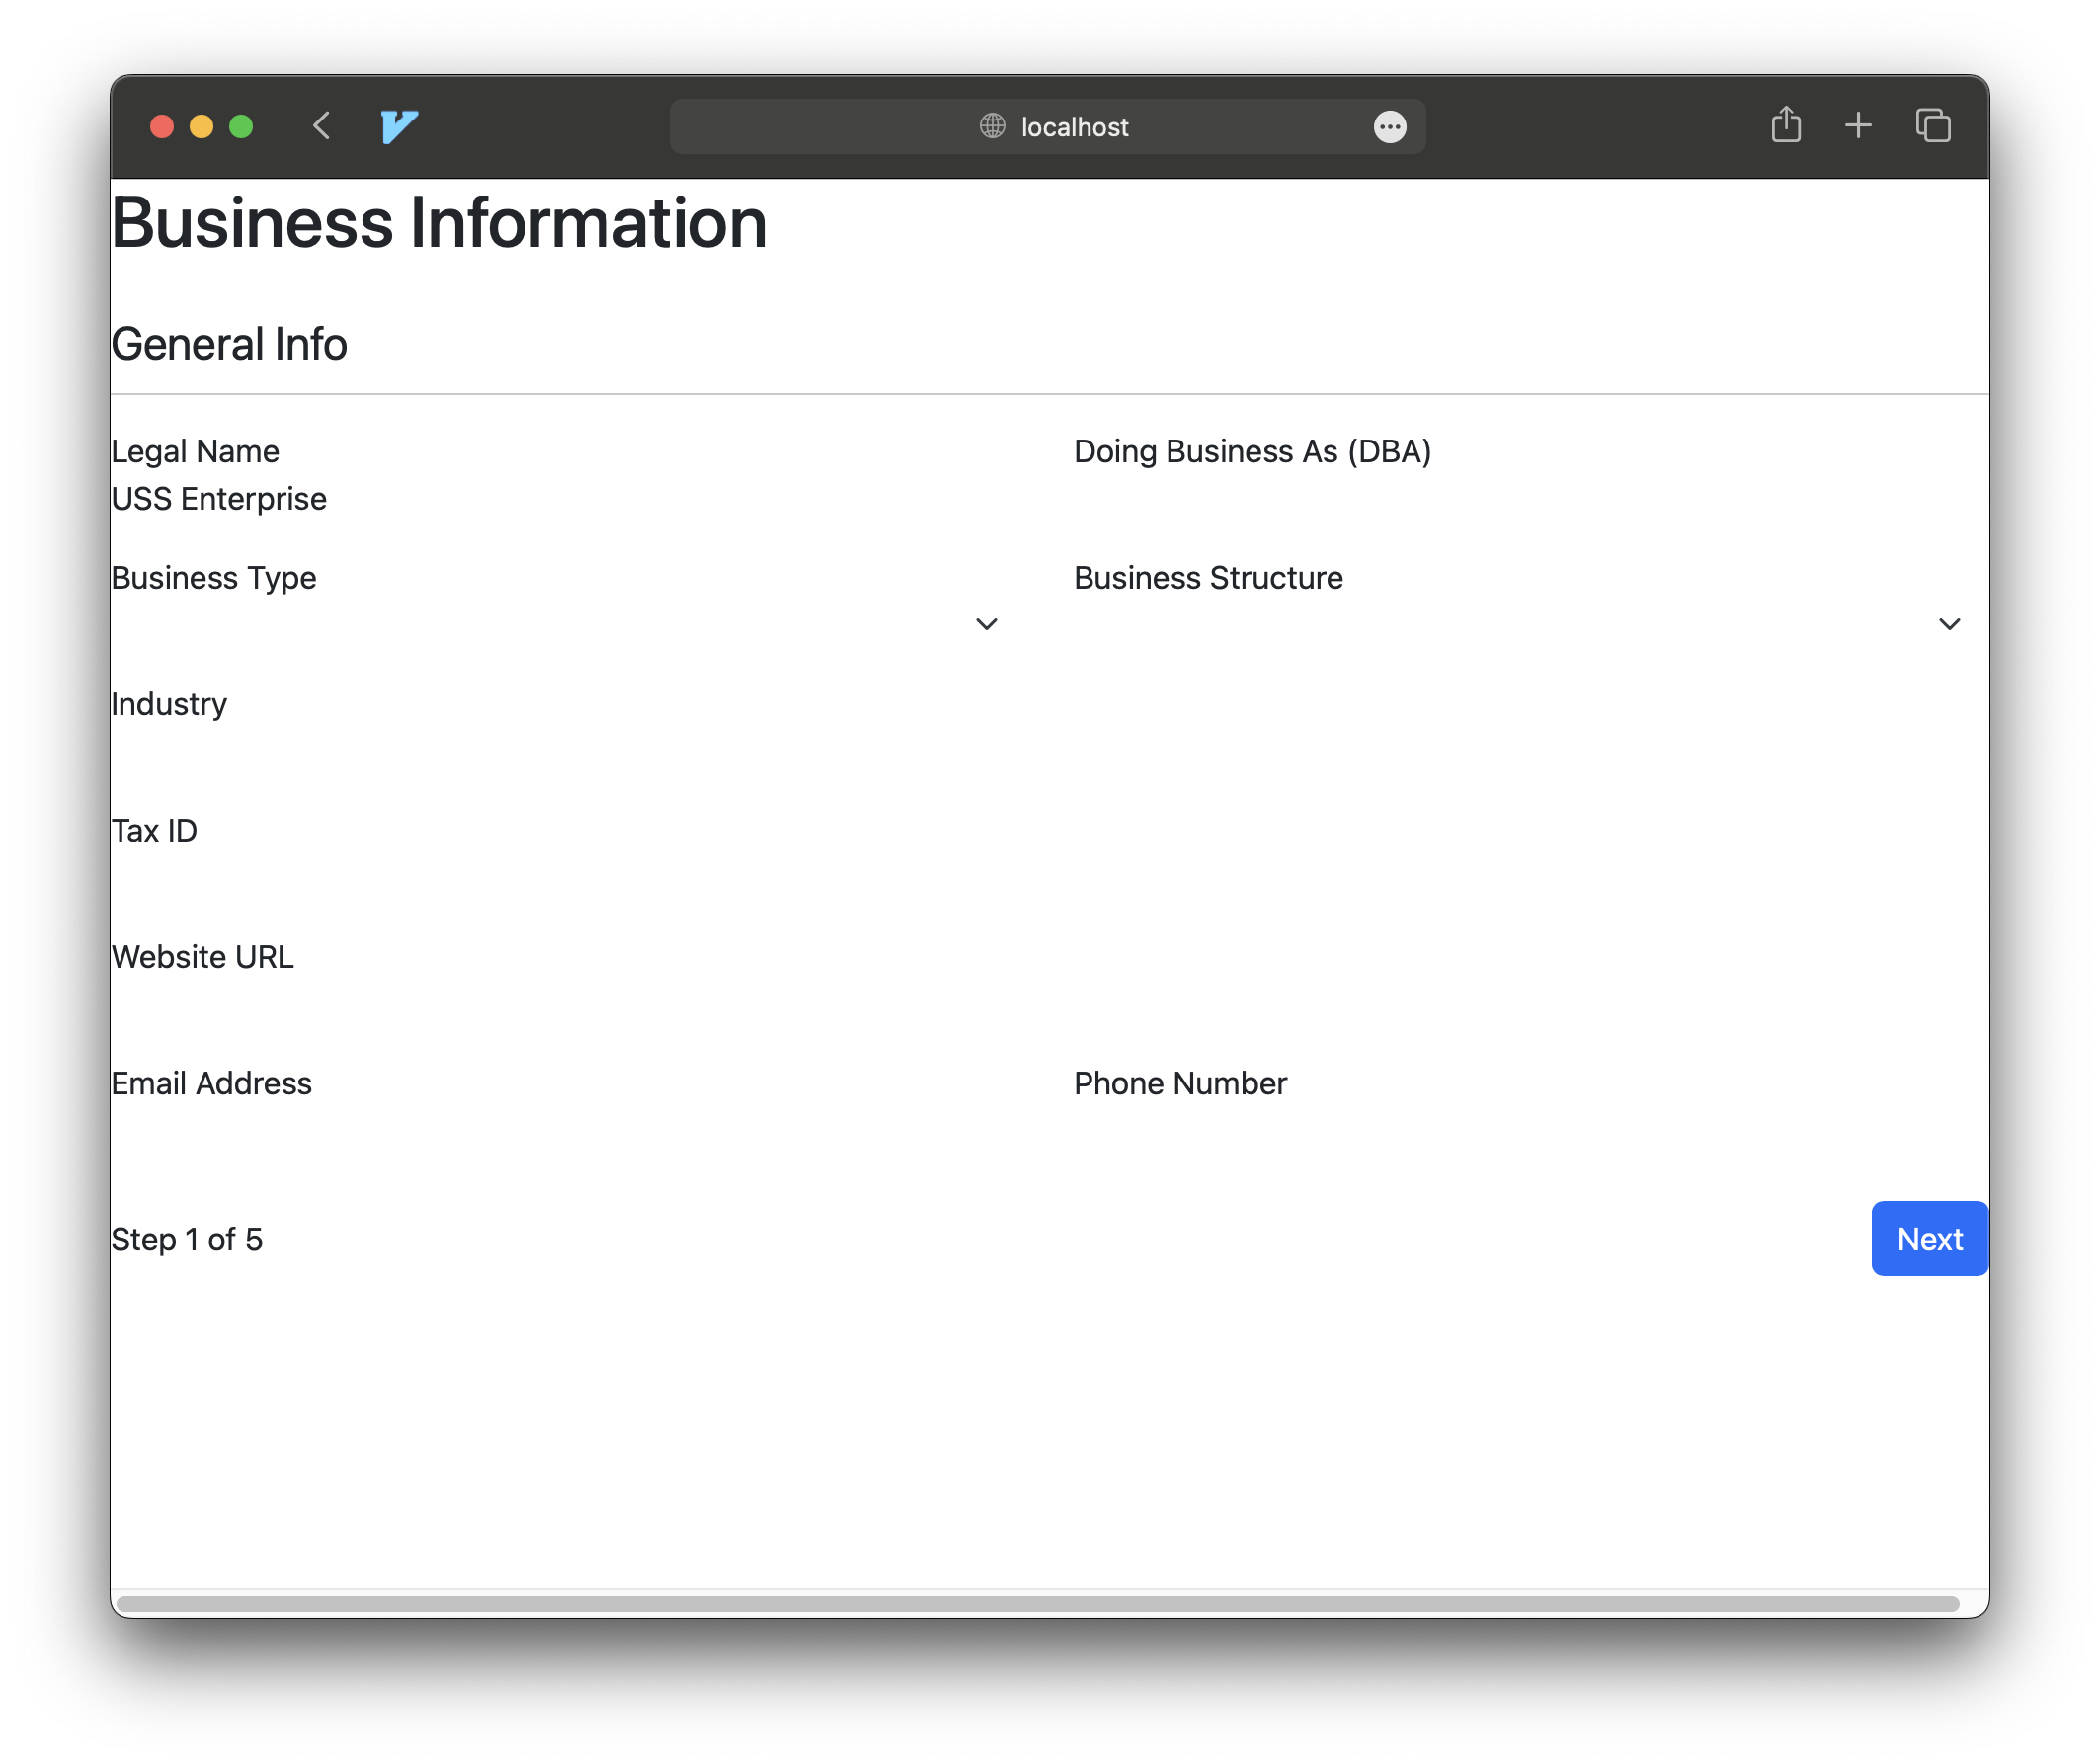
Open the file or go to http://localhost:8000/payment_provisioning.html, you should see the payment_provisioning form used for Onboarding:
Example Web Component implementations
Payment/Payout Components
To use our payment and payout components, you must grant a web component token for the sub account for which you'd like to show the payments or payouts.
- Choose the sub account id (acc_abc1234)
- With business OR sub account id, generate WC session read:account:
id - Render component
Business Onboarding
- Create a business via create business API
- Create Web Compontent Token for Business write:business:
id - (optional) confirm WC token on Customer Admin Dashboard
- Render the Payment Provisioning Component with the WC Token (note good 60 minutes)
(optional) Activate business for payments
- Accept terms of service via Terms and Conditions API
- Upload onboarding documents via Documents API
- Add a payout bank account for the business via Bank Accounts API
- Provision Payments product via Provisioning API
View Business Details Management
- With Business ID, generate WC session read:business:
id - Render Component
Future documentation
We will document our checkout components and the card, bank account and payment forms here as they become available.